?In a hurry? Click here to skip to the step-by-step instructions on how to enable feed rules in Merchant Center Next.
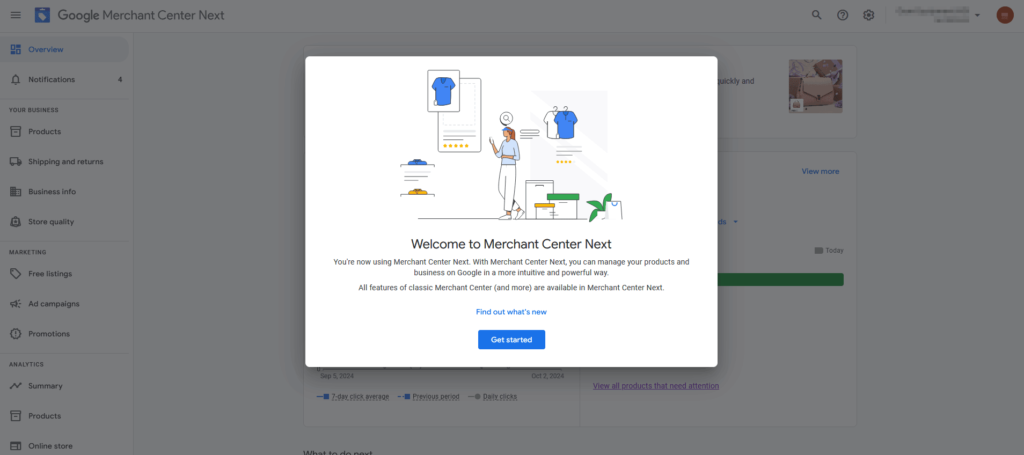
Last year, Google announced the new version of Merchant Center called Merchant Center Next. For a long time, it was an optional upgrade for users. However, a few months ago, Google announced that they would automatically move all users to the new version in September 2024.
New Features
The main change is in the interface, which has become more intuitive and better aligned with the rest of Google’s product suite. Google Merchant Center Next also brings some new functionalities, for example:
- Product Studio: An AI tool for generating product images
- Easier-to-understand insights about product performance
- Improvements in catalogue management for sales in multiple countries
- Crawled product data from your website is now added by default
- Better integration of online and offline sales channels
What We Think
Initially, we didn’t migrate any of our clients, as we didn’t see any significant advantages. On the contrary, the new version of the Marketing Center seemed incomplete and lacked some of the more advanced features for managing product catalogues, such as feed rules.
We weren’t the only ones. Many advertisers were dissatisfied with Merchant Center Next a few months ago.
Now that migration has become mandatory, Google seems to have added all the features that existed in the classic version to the new version, including the very useful feed rules.
Feed rules allow you to manipulate product feed data so that they comply with Google Shopping specifications. They can also be used to enrich catalogue information, thus optimising the product listing performance – both free and paid.
But where have the feed rules gone? ?
Enabling Feed Rules on Merchant Center Next
Feed rules are not enabled by default in Merchant Center Next, and finding them is not very straightforward. It took us a bit of digging, mainly because they are now called “attribute rules”.
But, once you enable it, you will have the same feed rules experience you had in the classic version.
Here’s the step-by-step guide to enabling product feed rules (now called attribute rules) in Merchant Center Next:
1) Click on the ⚙️ gear icon in the upper right corner, and select Add-ons
2) Look for the add-on called “Advanced data source management” and click Add

Note: If you already used feed rules before, the add-on may be already activated. You can find it in the “Your add-ons” tab.
3) After confirming the addition, the add-on will appear in the “Your add-ons” tab of the page
4) Now that the add-on is activated, click again on the ⚙️ gear icon and select Data Sources
5) Click on the product data source you want to manage. If you don’t have one yet, you need to add a product feed – it can be a spreadsheet, an XML feed or through integration with your eCommerce platform.

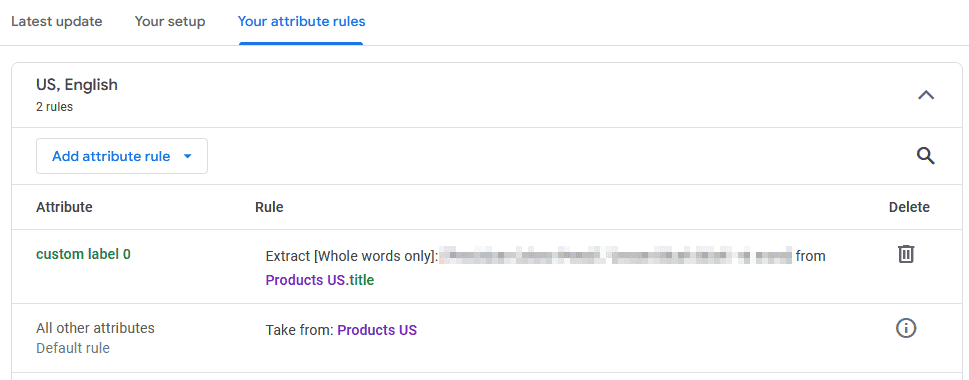
6) You should see a new tab called “Your attribute rules”. There you can add, edit and delete attribute rules in the same way you did in the classic version.
It’s not exactly intuitive, but hopefully, this guide saves you the initial frustration we experienced.
Why Should I Use Attribute Rules on Merchant Center?
You don’t necessarily need to use attribute rules, but they can be useful in various situations. Here are some common scenarios where we’ve found them particularly valuable:
1) Missing Attributes
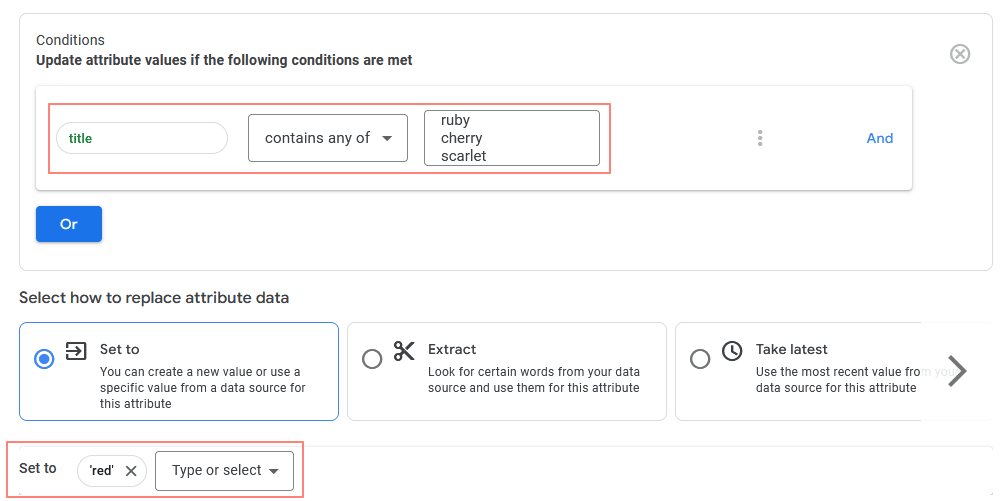
If you have a clothing brand, for example, Google requires some parameters to be filled in in some countries, such as colour, age group and gender. These attributes may not always be available in your product feed, or perhaps they don’t meet all of Google’s guidelines. And, as you should know, missing or incorrect attributes can impact your product’s visibility, or make it ineligible.
In these cases, you can use feed rules to fill in the missing information.
For the colour attribute, for example, you can create a rule that extracts the colour from the product title and transforms it into a standard colour name, as the guidelines require.
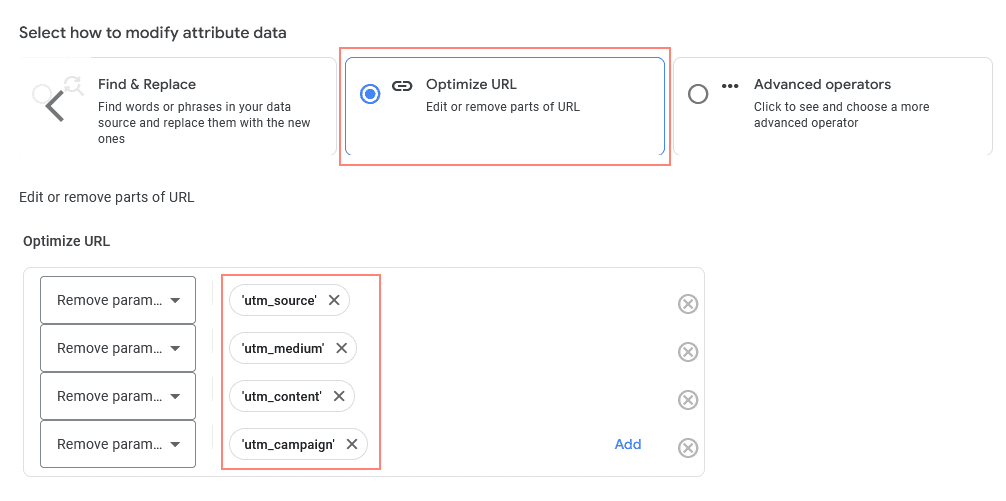
2) Cleaning URLs
For some reason, the official Google Ads sales channel on Shopify automatically adds UTM parameters to product URLs. However, if you run ads on Google and use tracking templates to add UTM tags to your ads, this can create conflicts between the parameters and mess up your data in Google Analytics (or any other tracking tool).
These are the UTM tags that Shopify adds by default:
https://your-shopify-store.com/products/product-title&utm_medium=product_sync&utm_source=google&utm_campaign=sag_organicUsing a tracking template in Google Ads, the URL of your sponsored product listings would look like this.
https://your-shopify-store.com/products/product-title&utm_medium=product_sync&utm_source=google&utm_campaign=sag_organic&utm_medium=cpc&utm_source=google&utm_campaign=pmaxSee? There are two UTM Source and UTM Campaign parameters, with different values, and this can cause a big problem when analysing eCommerce performance.
To solve this, you can create a feed rule that removes the UTM parameters from the URL and leaves them clean so they don’t interfere with the parameters added by Google Ads.
3) Grouping Products
If you use Shopify, you probably use Collections to organise products into groups. However, product collections are not synced with Merchant Center when using the official integration, leaving you with few options to group products by default.
Product grouping is very useful when running Google Shopping ads, as you can target campaigns by product group. For this, we use the custom label attribute.
There are several ways to use this field:
- Group products based on title (e.g. if product title contains “Ring”, “Necklace”, “Bracelet”, set attribute to “Jewellery”)
- Create product price brackets (e.g. if product price < £100, set attribute to “Under £100”)
- Identify items on sale (e.g. if sale price has a value, set attribute to “Sale”)
Time to get creative with attribute rules! They are a powerful tool in managing your product catalogue and optimising both free and paid Google Shopping listings.
Are you struggling with Merchant Center Next? Feel free to give us a shout.